Sunday 31 August 2014

3 more for 104 Round II - Card 17

Three more flowers to add to the  flower ticker at the top of my blog. That makes it 104 flowers that I have used up so far this year. Not even half way yet...Yikes...Think I had better start cruising my Pinterest boards for more ideas.

This is another card featuring the Memory Box, Massa Leaf Frame die. I inked it with the Invild Bolme chalk inks again and then tucked a snippet of hessian over the aperture. Once again, I used some teensy tags that came with the First Edition Boho 6x6 paper stack.

Added some more flowers from my never ending stash.  Staring at the card photo as I type this post, I wish I had just added one. Three is a bit of overkill, methinks.

I have not added a sentiment yet. I thought the two little birds on the tag makes it perfect for an Anniversary card. I will add a suitable insert once home again as we do not have a printer up here..


Recipe
DP - First Edition Boho Chic
Card Stock - snippet of white card inked with greens
Die - Memory Box Massa Leaf Frame die
Flowers - Prima or maybe Recollections...I think
Hessian - from my stash
Tags - Cut from the First Edition Stack embellishment page
Bling - teensy green diamond on the tag...from my stash
Ink - Prima Invild Bolme chalk inks in two shades of green, and also a cream

I am entering this card in the following challenges
1. Pixies Crafty Workshop - must use snippets (the hessian and the card for the die)
2. We Do Doobadoo - texture
3. Simon Says Stamp - Anything Goes I did use a memory Box Die

A few readers have wondered how I craft in an RV. I have mentioned B4 that I craft in the bunkie  (our 8 x 10 foot guest bunkhouse). I work on a folding 2 x 4 foot table from Costco, where I  have my two long Rubbermaid under the bed boxes, sitting out on the futon bed. When company comes, the table gets put outside and is employed as a bar surface. The Rubbermaid boxes slide under the bed and the room is ready for your visit! You can see the lids just beside the boxes.

Here is a close up so you can see what it all is...


The long bin on the right of the screen holds my little one page photo albums from the Dollar Store. Some hold die cuts I have rolled off at home, and one holds images waiting to be coloured. Another holds images I have already coloured! The pink box is my pencil crayons and nibs; the middle larger box holds some embellies; the pink plastic file envelope is some bling, and the back bin is some stamps and 2 Momento ink pads and blocks, with my chalks perched on top.

Next long bin to the left holds some 6x6 pads of cardstock and DP. There is some Xmas DP and  regular everyday DP as well. Across the center of that box are my finished or almost finished cards. Behind that are my copics and other pen.  Tools and glue tape etc are at the back.

Far bin on the left of the screen is some prefolded corrugated cards and Xmas embellies, The blue bag is ribbon...hahahahha...Too funny, considering how I rarely use ribbon! I don't know what came over me to pack up this much ribbon! It does hold jute and twine as well...but still!

Here is where I work...just across from the bed! I was painting the dresser and night table with Annie Sloan chalk  paint just B4 this photo. The Ott light usually sits on the dresser but the wax has to cure for 4 or 5 days. There is just enough room for a wastebasket at the right edge of the table! We hope to add a TV in here next year. It will sit angled across the dresser so it can be seen from the bed.


Now, here is the bunkie with my craft supplies put away under the bed. It is set up for my youngest daughter and my two grandchildren (arrived today). Little Miss C sleeps in the top bunk, my daughter on the double bed futon and Little Mr P camps out on a thick foam mattress on the floor. I do have to slide the night table over to sit alongside  the dresser, to accommodate him...but this gives you an idea. The sheets and quilts are stacked on the bed...This Grandma was too tired from painting the dresser to make the beds up this time! lol
You can just see the edge of Little Mr P's mattress tucked under the blue futon.


Here is the rest of Little Mr P's bed...


Beside him is the finished dresser and night table. Well, not quite finished as I still have to add the silver Viva Gold to the edges of the router detail on the tops. I then will add the final step... distressing the whole thing with a lick of soft green chalk paint added to the next coat of wax.
That will have to wait as I need to give my hands a rest for a bit though!
Oh look, there is a slim sized 12x12 iris cart under the dresser...I forget what is in there!


The dresser and night table were a find off Craigslist. The night table drawer handle does not match so I am watching for another one. I did Annie Sloan it up a little, to try to get it to blend in!

We have just stripped wallpaper off the walls. They now need the drywall seams sanded, as well as various screw holes and marks need patched as well. A new coat of paint will follow. Then I will have to pester DH to bring up some of the left over baseboards from our house remodel, and lay it in here!

If you stuck with me so far, good on  you! This is crafting at the lake...bunkie style! Got to run as I am being called in to play Horse-Opoly...a horse mad little girls Monopoly game!!!   lol

Friday 29 August 2014

Pet Loss - Round II Card 16

Poor Little Miss C woke up one morning last week to find her Chinese Fighting Fish had died. It was about 4 years old and lived on the kitchen island. It was very social and would try to jump out of the tank if it liked you and you paid it some attention. My how that fish loved it when the kids came downstairs for breakfast.

Little Mr P has one too and has kindly offered to share his fish with her! It lives on the island too and watches them with great interest as they eat their breakfast. Sadly, her day got worse when she went to check on her rabbit, she found it had died in the night too. Her Dad thinks a racoon came by and the poor bunny was frightened to death.

I have made this card for the two of them as I know they will be watching the mail, expecting this Grandma will send something.


I had this rhinestone cross tucked in with the images I brought up here. I was planning  to make a Christening card with it. I thought it was perfect for this sad occasion so figured i can sort the Christening card out once I am home.

I only had a few dies with me that layered at all, so had to use what I had. Some of you may in fact recognize the Spellbinder kraft Fancy Labels 2 die, that has already been layered with the soft pink background and then painted here and there with some ivory acrylic craft paint.  I did a series of card with these dies and tones last year...luckily I had one die left over.

I stuck the cross to that die and then layered it onto a black diecut that came with a scrapbooking kit (about 10 years ago)! That is my VOS item for sure! I did not realize I even had this black die with me. For some reason I stuck it with my diescuts as I was rolling them off. Thank goodness I did.
I then placed them onto a Memory Box Debutante die, and attached that to  a piece of black houndstooth paper. I did not actually have any black DP up here...this was cut off the front of a prefolded note card!

I was working backwards from my usual...cuz when my whole card top was finished, I then glued it onto a 4/14 x 5/12 card base. Weird I know, but that was the mood I was in...lol


The inside is a wee envelope that I bought at Michael's quite some time ago. I sliced off the folded top and made it into a pocket. I then wrote a little letter to them both, folded it up and place it inside the pocket.
At 6 and nearly 8, they are still young enough to like the secret letter in a pocket idea.

Hope you like it...it was a very sad card to make and this Grandma had tears in her eyes making it!

I am entering this card in the following challenges:

Wednesday 27 August 2014

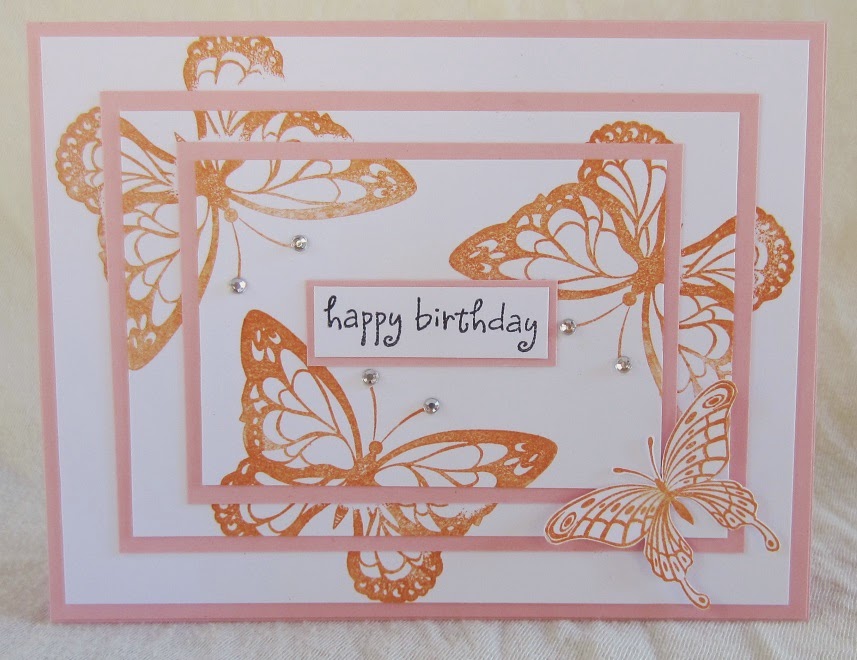
Butterflies with Sentiments Round II Card - 15

The theme at The Butterfly Challenge is Butterfly cards with a sentiment.

This summer has brought the usual hot, dry weather to the Shuswap. As my DH would say...that is why we are here! Some weeks had temperatures hovering around 35 Celcius and some days even hotter! The RV got so hot, we needed to turn the air conditioning on to prepare supper. We were barbqueing and eating in the shaded gazebo every night, but still there is meal prep etc, and it was quite stifling inside!

The vivid colours of summer seemed washed out from the heat. Unless irrigated, everything is a soft golden tan here,,,the grasses on the verges, the fields, even the flowers, seem washed out from these high temperatures.


This triple stamped card is showing that hot, Shuswap summer look. While the orange butterflies are a vivid shade, the pink framing mats are quite subdued. Just like summers here...

This was my first attempt at triple stamping.
I do not have a steady hand or steady pressure when I stamp so my images do show that flaw...but I do not mind it too much on this card.  I fussy cut and pop dotted the bottom right butterfly, and then added a little colour to him after the fact...he just blended in too much without it.

I made this card a while back, but just posted it now, as I think it fits the theme at Mrs A's Butterfly Challenge.

Recipe
Card Base - hand cut from stash
Card stock - snippets of pink and also white card...just ordinary white card stock as it is not coloured, so didn't have to worry about bleeding inks!
Bling - teensy clear diamonds from my stash
Stamp - Inkadinkadoo Butterflies
Sentiment Stamp - Costco (years ago... this is my VOS item)

Iam entering this card in the following challneges
1. Pixies Crafty Workshop - must use snippets
2. The Butterfly Challenge - Butterflies With Sentiments #13
3. Simon Says Stamp Wednesday Challenge - Anything Goes


Monday 25 August 2014

August Rudolph Day Round II Card 13 and Card 14

It is the 25th of Aug and that can only mean one thing. It is Rudolph Days over at Sarn's Stamping for Pleasure. You have until the end of the month to submit two Xmas cards on the same post. They can be two of the same card or two different!

Card 13 is a Wild Rose Topper that reminded me of the granchildren! Little Miss C always has a couple of fancy party dresses at Christmastime. There are always lots of parties to attend and she still enjoys getting dressed up. Little Mr P always hasa new set of dress pant,s and a nice shirt and tie. Tugs at my heartstrings to see him, shirt tucked out, with his tie all askew!  They both get dress coats (sometimes like these), and look just smashing, This topper with the waifs in their Xmas finery,  reminded me so much of them.

The fancy ivy and bow cutwork to the right, is a cupcake topper. It is a fairly heavy weight shimmery paper...perfect for accents. I think it is heavy enough to even hang off the edge of the page without getting bent! I trimmed it down to fit the card size and ticked it under the snippet of striped DP!

Final touches were a couple of K&Co 3D sprigs of greenery. To keep this card flatter, I peeled the 3D bits apart and reassembled them with less foam.


Sadly, I bent the "t" and was slightly askew with the sentiment rub on. There is a simple fix for these problems. You cut a slender piece of scotch tape just a hair bigger than the letter and much longer. Place the end over the letter, hold the rest of the tape between your fingers and use pressure on it to lift the bent t up. Carefully lift up and then tilt the tape into the correct angle to striaghten it!  Then rub it back on! The tape must be cut very slender or you will pick up the letter next to it!

To fix a crooked rub on, cut a piece of tape bigger than the rub on and stick it down and lift it off! I shall just do that once home and put a new rub on down. I think scotch tape might be called cello tape in some countries. You want to use the one that is sort of cloudy with a satin finish...not the sticky shiny clear tape!

I do not have tape up here so will repair it once we are home again.

Recipe
Card base - from my stash
DP - beige snowflake DP is Studio Calico Winter Wonderland; striped DP is Best Creations from my snippets box; green striped mat is unknown from my snippets
Embellishments - red cutwork is a cupcake wrapper from the dollar store cake decorating shop. 3D greenery is K&Co
Bliung - teensy diamonds from my stash
Topper is Wild Rose Studio - Annabelle and Antoine at Christmas
Rub On  - KaiserCraft

Card 14 is another WRS topper. Again I tried to keep it flat for mailing. All snippets from my files. The stripey DP border is actually two scraps that just tuck under the topper by about 1/3 inch! lol Amazing what you can do with scraps!

I peeled off and reassembled the corner 3D greenery again to keep it flatter. Tried to keep it no higher than the diamonds as it does have to fit through the infamous slot. My measuring tool is at home but this one is going to be a close call on whether it makes it through!


The ribbon is probably a decade old. I am not sure exactly how old, but it is a VOS item indeed! Angled it across the corner as it was a smallish snippet and just fit. Thank goodness for Sook Wang tape...it will hold anything!

Recipe
Card base - from my stash
DP - green background and red knitted look DP is Studio Calico Winter wonderland;  striped is Best Creations
Cardstock - DCWV self adhesive snippets of brown
Ribbon - VOS item...many, many years old...from my stash
Embellishments - K&Co 3D greenery
Bling - green diamonds from my stash

I am entering these cards in the following challenges:

1. Stamping For Pleasure Rudolf  Days - August RD must be two cards and must be Xmas
2. Marks Finest Papers Christmas Card Challenge - must be Christmas
3. Pixies Crafty Workshop - must be snippets
4. Crafty Hazelnut's Christmas Challenge Extra - must be Christmas
5. Crafty Hazelnut's Patterned Paper Challenge - must cover card with paper

Sunday 24 August 2014

Christmas Card Club - Cardinal Round II Card 12

This fortnight, it was Mary of Carolina Cards turn to chose the theme. Mary loves Cardinal's so it was no surprise when she chose that theme for us to follow!

I upcycled and made a Cardinal topper from a Christmas card that we received last year. It has a lovely satin finish with red mirri edging and I matted it on a snippet of silver mirri from my stash.

I wanted a clean feel to this card as well as the ability to mail it for regular postage! So clean it is.
One sheet of 6x6 paper, a couple of snippets of Christmas border from my bits box, and it was done. I must tell you that the red background paper is very close to the same colour as the cardinal' wing!!! Maybe even a litlel redder. I do not know why my camera is making the paper look a mauve/rose shade!

The fine red and white scalloped border is K&Co and the musical notes scallop I won in a RAK from Aliwinn on Two Peas In A Bucket (manufacturer unknown).  I am trying hard to use my Raks and prizes that I have been blessed with, so was pleased to work in that RAK'd border. Thanks once again,  Aliwinn.

I criss crossed some fine silver cord and tied it with a loopy bow,  just to tie the silver mirri card in.
I let the sentiment  on the designer paper be the wording, and called it a day. This is another card made at the lake and my Xmas supplies up here are sparse.

Recipe
Card base - from my stash
DP - Heidi Swap 6x6 Christmas pad
Card Stock - snippets of silver mirri and snippets of kraft card for the snowflakes
Borders - Red and white scalloped glitter border is K&Co; musical notes border is from a RAK
Bling - Beige Pearls from my stash
Cord - fine silver cord from my stash

I am entering this card in the following challenges:

1. Christmas Card Club - Cardinal
2. Pixies Crafty Workshop - must use snippets
3. Crafty Hazelnuts Christmas Challenge Extra - must be Christmas
4. Crafty Hazelnut's Patterned Paper Challenge - must cover card with paper
5. Marks Finest Papers Christmas Card Challenge - must be Christmas
6. Crafty Hazelnut's Christmas Challenge - Merry and Bright

Friday 22 August 2014

Island Life Round II - Card 11

Last year I won a set of stamps called Island Life from Marks Finest Papers. This set has two good sized images and many sentiments. I used the other image from this set on this card here.

I played with my Tim Holtz stains on some water colour paper before I left home and brought a few of the finished sheets with me up to the lake. One of them reminded me of the sky at night maybe just before or just after a storm...so I decided to use the second image from this set with it. The image on this background makes me think of the importance of safe harbour.

This card is going to someone who is going through some uncertainty right now.  So no matter what is brewing at sea, or on the lake, no matter what life holds, safe harbour is key. Family and friends can be that harbour and I wanted to show we are there.


Sadly, I did not think to write down the stain colours I used...my bad! The image is stamped with Momento brown and coloured with Prisma pencils and gamsol. It is so much easier and lighter to bring pencils to the lake instead of copics.

I made a little boo-boo when colouring and somehow dented the paper at the top right. I fussy cut out the image and pop dotted it onto another piece of matching card. This time I chalked the sky, trying to get something a little safer and calmer looking than the shades in the background. I just used a cotton puff for removing makeup to do the chalking...cuz that is what I had up here...lol.  A quick mat with a snippet of distressed brown card and it was ready to place on the background.


The sentiment is Tim Holtz. I stamped direct to card. I am getting braver with that now.

I am happy with how this turned out. I have been trying to shake things up a bit with my card making by trying some new techniques. The TH stains have a learning curve, that is for sure. But I won't learn if I don't practice, so expect more of these backgrounds to show up on my blog.

P.S. I wet both sides of the water colour paper before running through the stain. I let it air dry and then weighted it. If there is a better way, please let me know. It was still not completely flat, but once attached to
the card base, it seemed fine. I wondered if I should have ironed it...

I am entering this card in the following challenges:
1. Pixies Crafty Workshop - must use snippets
2. Marks Finest Papers Inspirational Challenge The Blue S&P made me think of the sky and the sea.
3. Mod Squad Challenge - Coastal Inspiration


Wednesday 20 August 2014

Floating Butterflies Round II - Card 10

Mrs A has a current theme of Summertime Butterflies. Just before we came up to the lake, I was playing with Tim Holtz stains on watercolour paper, trying to grasp the techniques of using them. I had one page that just called out Summertime to me.

Once back up here, I die cut Elenor's Memory Box trio of Floating Butterflies from the watercoloured paper and then cut it again with some black card. I then inlaid the bits that formed the trio back into the black outline. Much easier said than done. I forgot to bring a sheet of the Sook Wang double sided adhesive paper up to the lake. So I improvised, and laid rows of tape across the back of the main bits and then lined up the black outline and laid it down overtop. I did have to do a small amount of fussy cutting the excess tape off...but it was not too bad.  PSA...Nail polish remover works great at cleaning glue off scissor!


I stamped a bit of a background with my NBUS Kaisercraft Hessian stamp. I stamped it twice and reversed the stamp to get the random lines on the outside edge of each side. I used Close to My Heart grey ink and then chalked over it with aqua and yellow chalk. I was trying for the look of the sky on a sunny summer day!

The inlaid butterfly trio was placed over the stamped background and then a couple of filigree butterfly toppers were popped forward, to flutter by. I happened to have the matching Vivienne topper for the larger butterfly but the smaller one I used is called Pippi, I think). Not a match, but with the wings up in the air, I think it is not so apparent at a glance! I used generous amounts of Stardust Stickles on the filigree wings and also on the outline of the plain butterfly.


I used a NBIS sentiment from a Marks Finest Papers stamp, Island Life, that I won last year. I have been trying hard to put my winning items to use! That sentiment was stamped direct to card (while holding my breath).  A few diamond jewels placed on the butterflies finished it off!

Recipe
Card base - from my stash
Watercolour paper - from my stash
Tim Holtz Stains - from my stash... I did not think to write them down...sorry!
Stamps - Kaiser, Hessian background stamp
Dies - Memory Box Floating Butterflies and filigree toppers Vivienne and Pippi
Sentiment stamp - Marks Finest Papers, Island life

I am entering this card in the following challenges
1. The Butterfly Challenge -  # 12 Summer Butterflies
2. Pixies Crafty Workshop - must use snippets
3. Sister Act Challenge - # 70 Anything goes
4. Marks Finest Papers Inspirational Challenge - #76 Painted floors. I was inspired by all the texture in the third photo. It made me remember my grungy hessian stamp. (I used a MFP stamp for the sentiment)
5. The Artistic Stamper - August Challenge Anything Goes

Sunday 17 August 2014

Warm Wishes Round II - Card 9

I have had these adorable mice coloured up since last year. I have been trying to purge some of my older wooden stamps, but this one from Great Impressions made the cut to stay. Thought it was about time I let these little fellas out to play.

Covered my card base with Best Creations Merry Christmas Glitter DP and then added a strip of striped Best Creations (B side)  that I matted with a snippet of charcoal shimmer card. Left a bit more of the charcoal at the bottom  and punched it with a Martha Stewart border punch.

Matted my image with another snippet of charcoal shimmer card...sort of a satiny glitter. Then matted again with a snippet of  green.  Tucked a couple of Dollar Store sparkly fabric snowflakes under the image and then layered up a trio of poinsettias. I made the middle one slightly different and slightly smaller, than the other two. Now I can add 3 more to my flower ticker at the top of my blog. I have used over one hundred flowers so far this year. I have a long ways to go to meet my target of 365! Guess I had better start trawling Pinterest for more flower card ideas.

The brads are MME I Believe and were part of a RAK I won a while back from Aliwynn, a cardmaker and scrapbooker at the old Two Peas In A Bucket. To see the whole collection that I won, click here.
I was very lucky indeed.

The sentiment is from a little box of sentiments I stamped a couple of years ago. I like to take the wee scraps of copic paper leftover after I cut out images...and stamp sentiments on them right away. That way, I have sentiments ready and waiting and the colours of the white paper match!  I edged round this wee stamp with some Prima, Invild Bolme green chalk ink.

Threw on a trio of large green rhinestones to help balance the flowers and added teensy clear rhinestones randomly on the background DP snowflakes.

This was a fun card to make and I think i got caught up in the Xmas moment cuz I  caught myself humming a Christmas carol!!!

Recipe
Card base - from my stash
DP - Best Creations Merry Christmas 6x6  glitter stack (A and B sides)
Card - snippets of green DP and charcoal shimmer card
Stamp  - Great Impressions F179
Sentiment stamp - not sure...might be Stampin" Up
Snowflakes - fabric ones from my stash
Flowers - Scrapbook Sally poinsettias
Brads - My Minds Eye, I believe
Bling - green diamonds and teeensy clear diamonds from my stash
Ink - Memento black,  Copics, and Prima, Invild Bolme green chalk ink

I am entering this card in the following challenges
1. Pixies Crafty Workshop - must use snippets
2. Marks Finest Papers Christmas Card Club - must be Christmas
3. Sweet Stamping - Christmas In August
4. Graph' it Colour Challenge - furry stuff
5. Sister Act Challenge - Anything goes

Friday 15 August 2014

Summertime Butterflies Round II - Card 8

Mrs A's Butterfly Challenge currently has a theme of Summer Butterflies. I thought I would play with my Memory Box dies, and see what I could manage to make.

The patterned paper used here is very special to me. It is from the summer collection by Maja Designs and I won both the Spring and the Summer Collection last year, in a Maja Designs blog candy. It is the most lovely paper to work with. It has a fabulous distressed look to each sheet that I just love, and the papers are a great weight as they are also double sided.

The books are 6x6 and they have so many pages in them..120 pages in total. Here is a photo of my wonderful prize! You can expect to see me using many more of these pretty papers...

Now, onto my card...The floral page I chose for the background is the A side and the bits of rose coloured dotty paper is the B side of my page.
 I cut the Memory Box Thank You Extravaganza die from snippets of teal card and then handcut the dotty piece to fit behind. I hand cut a second backing with another snippet of teal card,  just to help it stand out a bit more. In retrospect, I wish I had skipped the dotty paper and just used cream card but a DP laid is a DP played...or at least it is, once it is glued down!!!


I then cut 2  MB Madiera Corner Dies and layered them on the card. I used glue dots sparingly on the top layer as I wanted it to have a bit of movement left to it. A couple of teensy diamonds and the corner was done. Now, onto the butterfly...

I cut the Kaleidoscope butterfly from the same teal, and  cut the butterfly backing piece from the same dotty paper that is behind the sentiment die.
Here is a little close up...hopefully the butterfly and the corner piece look like they are floating in the breeze!

I


No recipe tonight as this is a simple card and I have already told you those details!


I am entering this card in the following challenges:
1. The Butterfly Challenge - #12 Summertime butterflies, hopefully a butterfly lighting down on roses in full bloom is summery enough!
2. Crafty Hazelnut's Patterned Paper Challenge - must cover card with paper
3. Marks Finest Papers Inspirational Challenge - The fancy chandelier contrasted against the wood walls (which look a bit pinkish in the photo) made me think of this fancy Thank you die.

Tuesday 12 August 2014

Breaking Out Of A Rut! Round II - Card 7

I am breaking out of my rut and making an effort to make some cards that are a bit of a different look for me. I am enjoying shaking up my game a little!

This card is a bit more CAS than my usual cards. It was designed by my friend Elenor...she is my neighbour up at the lake. She and Janice are just a few steps away from our RV lot and the three of us met up at the clubhouse last week. We all brought a card kit for each other. It was so much fun. This was Elenor's design and I think it is so pretty.


Sadly, I screwed up the card a wee bit. I stamped my background with Elenor's grungy stamp (love this stamp BTW). I then matted and tied a snippet of ribbon around the reverse image of the Memory Box Poppy die. Elenor had already embossed the black mat with what I think is Swiss Dots EF. I then attached that to the prefolded card. The actual poppy diecut was glued inside and the "Thinking  Of You" was glued to the front right hand panel.


Now...my problem...

How in the world do you glue down these fine, fine dies? I used a glue pen and sort of waited till it got a bit sticky and then tried to place it with tweezers. Even with 2 pair of tweezers I got it on crooked. Ugggh! In trying to get the glue off where the die had landed incorrectly...I managed to rub some of the surface off the paper just beside the flower bud. Then, when  I was cleaning up around the tall stems I managed to amputate one of the flower heads. I could not trim it up nicely and ink the edge to show less as it was already 90% stuck in place.

So I did what any self respecting crafter would do...stickled the heck out of the flower to hide the torn edge (somewhat hidden).


In all of the wrestling around of that finely cut die, I managed to dent the card! Twice!  So I cut the card into two pieces and then then cut a whole new card base and glued the 2 pieces to it. In all the trimming and cutting, I then managed to trim the black top and bottom mat edge almost down to nothing! I then decided to ink the edges of the white card base with black ink to make it seem like there was a little more of the black mat than there actually is. Now I even notice that I cut the left side a wee bit crooked...Jeeesh!

Me thinks this card will be kept as a pattern as it has too many boo boos to send it to anyone.   lol

But I like the look of it and plan to make another  a few more. I do not know the name of the fold as this is all new to me but this card folds on the left and on the right...it folds in three. The right side of the card folds fully over the middle,  and then it has a partial left side which folds back over that.   Clear as mud...right???

I am being really bold and submitting this card to the following challenges:

1. Pixies Crafty Workshop - must use snippets (Elenor's snippets)

Monday 11 August 2014

Mitchy Matchy Round II - Card 6

I made a card to match the gift bag I showed yesterday. Not completely matching, as the matching paper was up at the lake...but matching enough that it goes.


It is another Wild Rose Studio, Bluebell topper. Kept it very simple. Just matted with a snippet of green card and then used the last scraps of it to punch two tags for the sentiment. Luckily I had some Kaisercraft rub ons that fit the tags exactly! Saves hauling stamps back and forth.


Not sure the name of the designer paper as it is now up at the lake. It was bought just before my consumables freeze.  I must try to remember my friends neat organizing trick. She jots down particulars on a post it note and sticks it inside the card.  Things like the name of the die, the DP, etc. Great idea, I say!

Just added a few green rhinestones, the silver cord and dangling the tags.  (I did not have a teensy hole punch with me, so I threaded a needle and sewed the tags  on)

Recipe
Card Base - from my stash
DP - Studio Calico Winter Wonderfland 6x6 pad
Card Stock - snippets of green
Cord - silver cord from my stash
Bling - green diamonds from my stash
Punches - Martha Stewart tiny tag punch

I am entering this card in the following challenges:
1. Pixies Crafty Workshop - must use snippets
2. Marks Finest Papers Christmas Card Challenge - must be Christmas
3. Crafty Hazelnut's Patterned Paper Challenge - must cover card with paper
4. Crafty Hazelnuts Christmas Challenge Extra - must be Christmas
5. Simon Says Stamp - Sparkle (there is a row of green diamonds across the bottom of my card and my bag has glittered buttons)

Sunday 10 August 2014

Christmas Card Club - Anything But A Card - Round II - Project 5

This fortnight was Lizzie at Verity Cards turn to chose the theme. When I read it was Anything But A Card, I knew what I wanted to make.

This Christmas I plan to give a couple of gifts where the card and the gift bag match. Here is my first  Christmas gift bag this year. I will save the matching card for another post, after all this is an "Anything But A Card" challenge!


Gift bags are fun to make as you have such a larger surface to arrange your elements on. This bag is the last one from a Dollar Store set of three. The image is a topper from Wild Rose Studio, Bluebell At Christmas.


The large glittered snowflake button (at the top left of the bag) with the bit of silver cord tied through it, is my VOS item. I do not even know how old this is...had it forever it seems. At least 5 or 6 years methinks.  The smaller snowflake perched on the silver bow at the bottom of the card is also VOS. Much, much older...I am thinking maybe 10 years old!

The silver cord came from a garage sale...12 yards on a spool for 75 cents. I was pleased to find that bargain. I used a Martha Stewart border punch on the bottom of the kraft card. I think it might be called Cherish.  I am trying to make an effort to use a different punch or die on my projects, as I have a bit of a habit of reaching for the tried and true.

This gift bag will be for a family member who always chooses such lovely thoughtful presents for us.
 I want her present and the presentation to be special this year!

Recipe
Bag - from my stash (originally from the dollar store
DP - AC Merry Mint
Card Stock - snippets of kraft, and red Bazzil card
Image - Wild Rose Studio Topper; Bluebell at Christmas
Punch - Martha Stewart border punch...I think it is Cherish
Embellishments - snowflake button and snowflake embelly from my stash
Cord - silver cord from my stash  (originally from a garage sale

I am entering this gift bag into the following challenges:

1. Christmas Card Club - Anything But A Card
2. Pixies Crafty Workshop - must use snippets

Thursday 7 August 2014

Warmest Wishes - Round II Card 4

I had such fun with the Tree theme for the Christmas Card Club last fortnight, that I decided to make a second tree card. I have always loved this Penny Black image and realized that I had one already coloured, just waiting to be made up into a card.


I tried to let the pink and grey tones take over the card, but once I got the image matted, I realized that the dark rose on the image took over. So I gave into it and added a sentiment image, from that same already coloured, images album.  It had strong rose shades as well. While the colours are not identical...they are close enough that I think they are OK together. Once I got it stuck down, I decided it looked too perched up there at the top. I haven't managed to think of a way to overcome that flaw. I am afraid to try and remove it though so guess I am stuck with it! I have toyed with the idea of adding a dark rose snowflake border down the right hand side...but I am already at my limit of overhanging bits as the largest size you can get envelopes locally is 6 inches. Decisions, decisions...guess I decided to leave it as is...as here it is on my post...perched sentiment and all!!!

Here is a close up of the sentiment...I think you can just see that while I used round bling for everything else, I used teensy hearts on the three small snowflakes.


Recipe
Card base - hand cut from my stash
DP - Not sure where the grey birch trees are from...will suss it out once home again
Card Stock - snippets of pink card and also some black glitter card
Bling - pink and grey rhinestones from my stash
Image - Penny Black Warmest Wishes
Sentiment - not sure...will update once home again

I am entering this card in the following challenges

1. Pixies Crafty Workshop - must use snippets
2. Marks Finest Papers - Christmas Card Challenge
3. Simon Says Stamp -Wednesday Challenge - Sparkle

Monday 4 August 2014

Fore! - Round II Card 3

This funny golfer is one of the first images I ever coloured. I only owned ordinary brand pencil crayons and had not even heard of gamsol.
I think I blended with baby oil...and it took the colour over the edges in places, as I was not very adept at using it. But it is a funny image and I decided it should get let out of the binder jail it had been exiled to!
Somehow this image got a bit dogeared and slightly dinted while being stored..so I fussy cut him out and that allowed me to let the image extend past the golf ball die...well past the circle pretending to be a golf ball die!

I have been trying hard to shake things up a bit as I sometimes feel all my cards look the same. I chose some colours I would not usually combine and even tried a design that is a bit of a different look for me.

When I was flipping through my DP trying to chose some colourful papers, I found this sentiment and just had to use it. When DH got home from golfing, he said it should read Live, Laugh, Play, Cry!
Turns out he had a bad day on the greens...

Recipe
Card base - hand cut from my stash
DP - MME Lime Twist is the numbers paper and also the orange; Crate Paper is the green stars (all from my stash)
Card stock - blue and white snippets from my stash,
Dies - Spellbinder petite circles
EF - Swiss Dots
Stamp - Wood backed red rubber stamp I bought years ago at a garage sale. It is my VOS item

I am entering this card in the following challenges:
1. Pixies Crafty Workshop - must use snippets
2. Polkadoodles - Clash the Colours
3. Simon Says Stamp Wednesday Challenge - Anything goes
4. Penny Black and More - Anything Goes
5. Allsorts - Favourite Things (My favourite thing is golf, as if DH is off golfing, I can create in the craftroom all day)! Yay!

Saturday 2 August 2014

Carol Chirping Round II - Card 2

I was given this adorable image when I guest designed (quite some time ago) for Hazel at Crafty Hazelnuts Christmas Challenge Extra. I was lucky enough to be able to make my own choice of images...I could not resist this  cheerful little trio. They are the Winter Bird Trio from Bugaboo Digi Stamps.

As part of my personal quest to use my NBUS, I have finally made this sweet image up into a card.
I cut the image with a Spellbinders oval die and matted that with a Spellbinders Floral Oval.


I usually forget to add lace and ribbon till it is too late...but somehow managed to remember this time. I wrapped the lace around a snippet of blue and silver 12x12 patterned paper. Sorry I do not know the name as it was from my snippets file and was unmarked.

The ribbon was a case of making lemonade from lemons...literally. I wanted to tie in the yellow of the birds and decided to use a bit of yellow ribbon...only to find that the only yellow ribbon I had up at the lake, had lemon slices on it. So I stuck it down on top of the lace anyway, and added a pink diamond in the center of each lemon slice.  If you scrinch up your eyes and look at it carefully, they are now Christmas baubles! lol

Once I had the birds added to the card, I didn't like that the tree trunk seemed massive. It is not massive in the digi image, but because I chose to use an oval die, it made the tree seem really wide. So...it was feathers to the rescue again. I had a few different colours of dotted feathers and luckily there were some yellow ones. After I got those attached, I added a bit of leftover pink bling from the flower hairbands I made in the past. That seemed to do the trick and anchor them on the card.

I used a snippet of black card to cut a Memory Box note die but trimmed it down to fit the card corner.
I then cut their Merry die twice so I could layer it for a bit of depth. I would have done the same with the note die but I had just used the last snippet of that black textured card.

No recipe tonight as it was 35 Celcius today, and I am tired from the heat. I have given you the recipe in long form anyway!

I am entering this card in the following challenges.
1. Pixies Crafty Workshop - must use snippets
2. Crafty Hazelnut's Patterned Paper Challenge - must cover card with paper
3. DL.ART - Thankful Thursday Christmas in July
4. Crafting For All Seasons - Challenge 82 Christmas in July
5. Simon Says Stamp Wednesday Challenge - Anything goes
6. Crafty Hazelnuts Christmas Challenge Extra - must be Christmas
7. Mark's Finest Papers Speedy TV - Christmas Card Challenge